8 Rendering an image in Minecraft
The miner package makes it possible to manipulate minecraft. Here I will illustrate one use of this: reading in an image file and rendering it within minecraft as blocks.
8.1 Load and prepare an image file
First, let’s download an image file from the web. We’ll load it directly into R from the web, using the imager package.
library(imager)
url <- paste0("https://raw.githubusercontent.com/kbroman/miner_book/",
              "refs/heads/master/figure/karthik_ram.jpeg")
img <- load.image(url)
Print to see the size of the image.
## Image. Width: 300 pix Height: 300 pix Depth: 1 Colour channels: 3The image is stored as a 4-dimensional array: horizontal and vertical position, time, and color.
## [1] 300 300 1 3Let’s convert it to grayscale, and make it 100x100.
The level of gray is a number between 0 and 1. I’d like to coarsen
that to having 7 levels, which I can turn into different kinds of
minecraft blocks. I can use the R function cut.
8.2 Render the image in Minecraft
Now let’s load the miner
package and create a vector of different block types, from black to
white. We can use find_item to find the item IDs for these block
times. “Clay” has two possible item IDs; we’ll take the first one.
library(miner)
grayscale_blocks <- c("Black Wool", "Gray Wool", "Bedrock",
                     "Coal Ore", "Clay", "White Wool", "Iron Block")
grayscale_blocks <- do.call("rbind", lapply(grayscale_blocks,
                         function(a) find_item(a)[1,,drop=FALSE]))
Here’s the result:
##           name id style
## 81  Black Wool 35    15
## 73   Gray Wool 35     7
## 26     Bedrock  7     0
## 36    Coal Ore 16     0
## 149       Clay 82     0
## 66  White Wool 35     0
## 95  Iron Block 42     0
Now, let’s render that in Minecraft. We use mc_connect() to connect
to a minecraft server.
Let’s find the “host” player position, and put the image 20 blocks above his/her head. Actually, I’ll hard-code it in here, so if I re-run this it ends up in the same place.
Now, we render the image, with a nested for loop.
for(i in 1:100) {
for(j in 1:100) {
setBlock(host_pos[1]+i, host_pos[2]+j, host_pos[3],
grayscale_blocks[img[i,j,1,1], 2],
grayscale_blocks[img[i,j,1,1], 3])
}
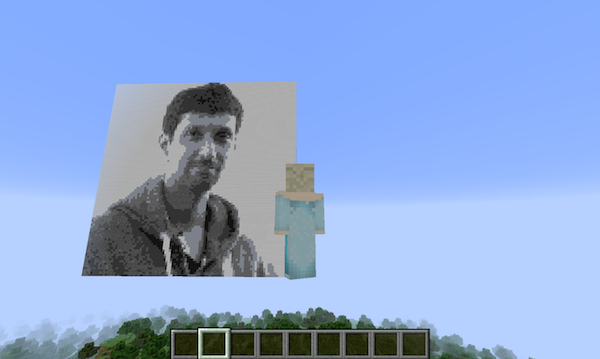
}Oops. that gives the image upside down and backwards. Let’s fix that.
for(i in 1:100) {
    for(j in 1:100) {
        setBlock(host_pos[1]+(101-i), host_pos[2]+(101-j), host_pos[3],
                 grayscale_blocks[img[i,j,1,1], 2],
                 grayscale_blocks[img[i,j,1,1], 3])
    }
}
The result looks like this: