usethis for R packages
I will demonstrate the use of the usethis and devtools packages to create an R package. I’ll be doing this in RStudio desktop.
Start with some functions
I think it’s best to start with some functions that we want to put in the R package. We will use a pair of functions: one for simulating Brownian motion, and the second for plotting the results.
# simulate Brownian motion
# n = number of steps
# sigma = SD of step size
# output is an nx2 matrix of positions
simBrM <-
function(n, sigma=1)
{
    stopifnot(n>=2, sigma>0)

    x <- matrix(rnorm(n*2, 0, sigma), ncol=2)
    colnames(x) <- c("x", "y")

    apply(x, 2, cumsum)
}

# plot Brownian motion
# x = matrix with two columns
# pointcolor = color of start and end points
# ... = passed to plot()
plotBrM <-
function(x, pointcolor=c("springgreen", "violetred"), ...)
{
    stopifnot(is.matrix(x), ncol(x)>=2, nrow(x)>=2)

    if(is.null(colnames(x))) colnames(x) <- c("x", "y")

    plot(x[,1], x[,2], xlab=colnames(x)[1], ylab=colnames(x)[2],
         type="l", las=1, ...)

    if(!is.null(pointcolor)) {
        points(x[c(1,nrow(x)), 1], x[c(1,nrow(x)), 2],
               pch=21, bg=pointcolor)
    }
}
Our goal is to make a package containing these functions.
Create package skeleton
We first use usethis::create_package() to create a directory for
the package plus the skeleton of the files that are needed.
I’m going to place it on my Desktop (because I’m just going to
delete it later). But generally I keep my R packages in ~/Code/.
library(usethis)
create_package("~/Desktop/simBrM")
This will create a directory to contain the package, create some of the basic files and subdirectories that are needed, including to make the package directory an RStudio Project, and then open up another copy of RStudio with that project open.
Make it a git repository
Next I’ll make it a git repository.
use_git()
It will ask me a couple of questions about making an initial commit and will restart RStudio.
Edit DESCRIPTION
I’ll next edit the DESCRIPTION file. I’ll click on it in the
Files pane and will edit the Title, Authors@R, and
Description fields.
The title is supposed to be in “title case” (all words capitalized), and the description is supposed to be one or more complete sentences (start with capital letter and end with period).
I’ll then click the Git pane in RStudio and stage and commit the change.
Put it on GitHub
I’ll next connect to GitHub and will push my repository there.
use_github()
If you’ve not connected to GitHub before, this will give an error, and you need to set up a “personal token” in order to do things like create github repositories from R. So you’ll first do:
browse_github_token()
This will open up a browser, ask you to log in to your github account, and will open a form to create a github personal token:
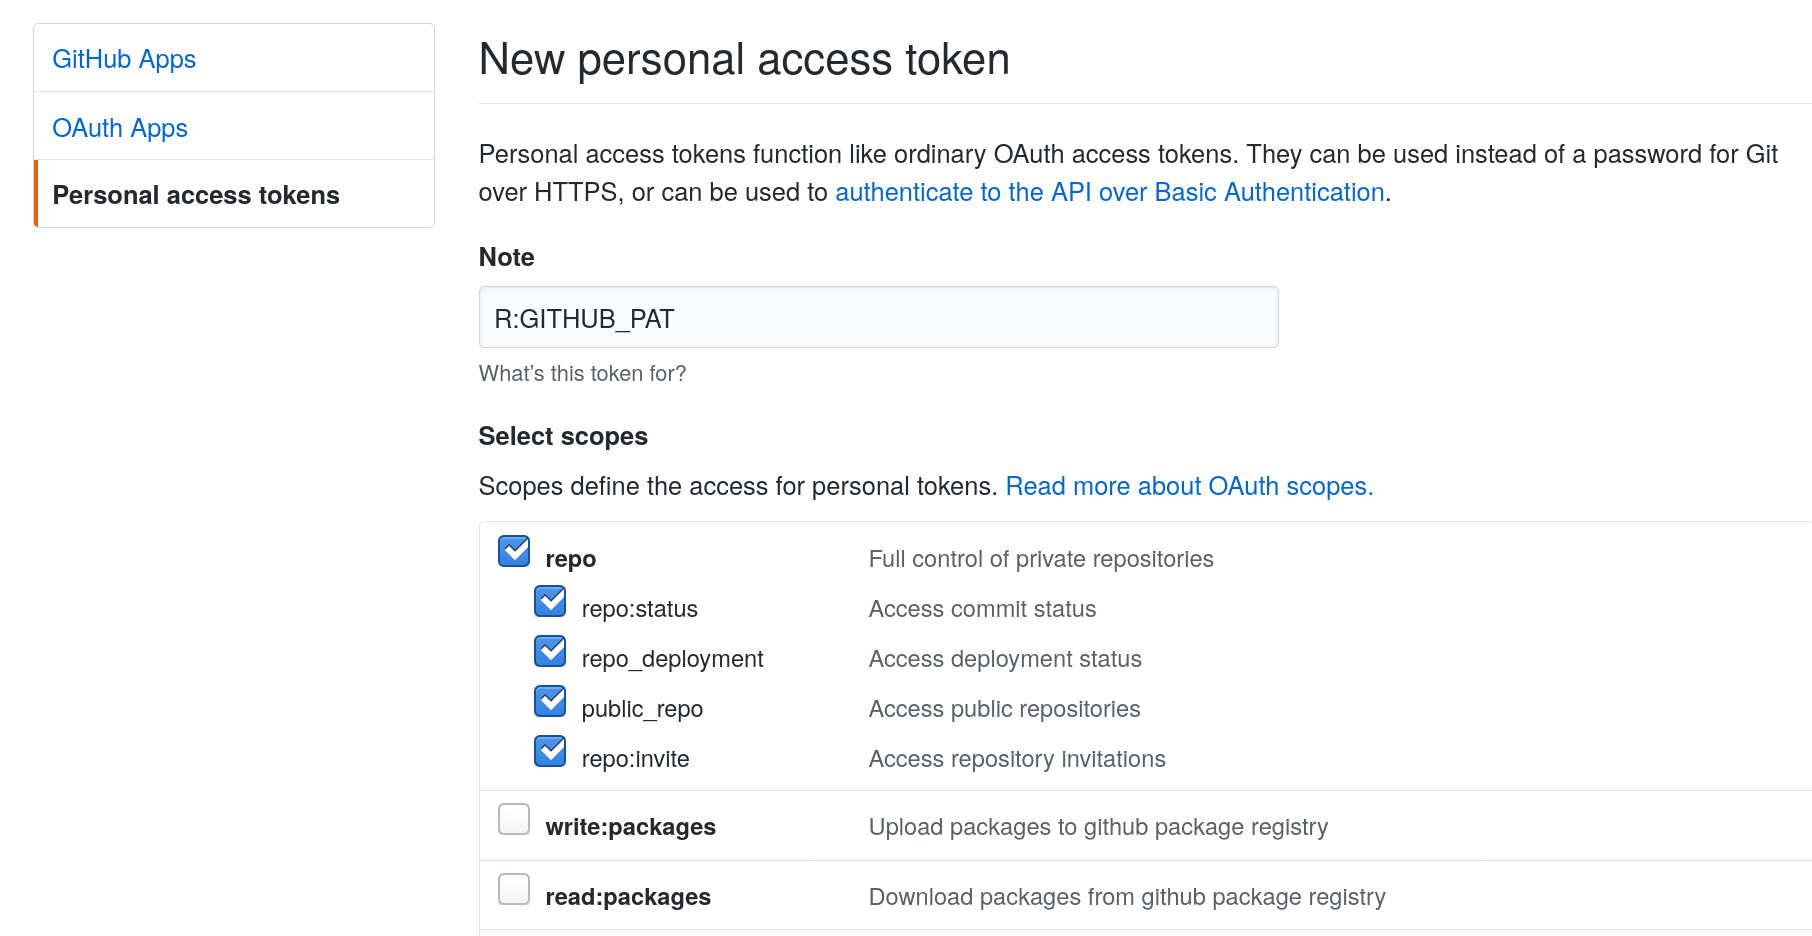
Agree to the form and it will create a token like the following, which you’ll want to copy but not share with anyone. (The one shown here is not my actual token; I deleted this one.)

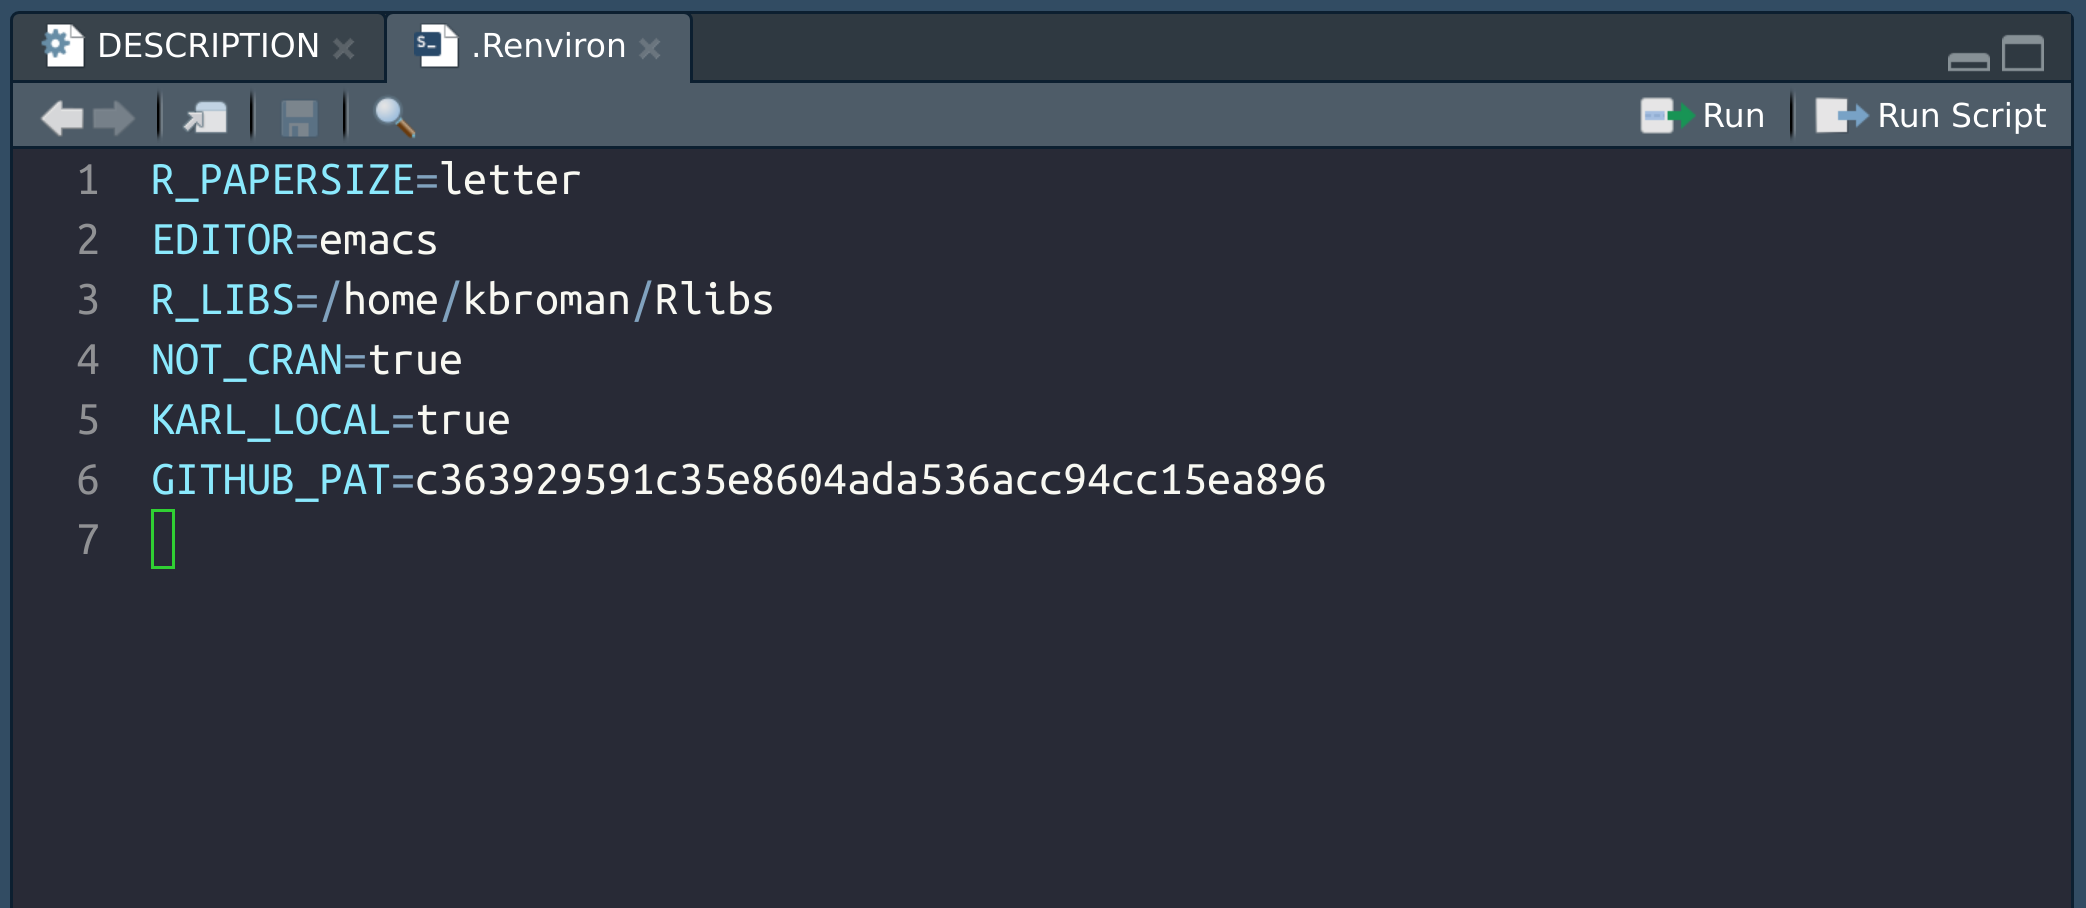
Finally, go back to RStudio and edit (or create) your ~.Renviron
file.
edit_r_environ()
You’ll want to add a line with GITHUB_PAT=[your token], as in the
following.
You might need to restart R (in RStudio, click Session → Restart R).
Then you can try again to make the connection to GitHub:
use_github()
This will create the repository at GitHub, push your materials there,
and also change the DESCRIPTION file to include the GitHub URL.
Stage, commit, and push the change to the DESCRIPTION file.
Try it out
Let’s try installing the package.
install()
We can also check that the package conforms to R’s requirements.
check()
Add a license
We got a warning about a non-standard license, so let’s go ahead and add a license. I generally choose between the MIT and GPL-3. (MIT if I can, GPL-3 if I need to.) We’ll talk more about this at the end of the course.
use_mit_license("Karl Broman")
This will add a couple of LICENSE files and edit the DESCRIPTION
file. Commit the changes and push them to GitHub.
Now if we run check(), it is clean.
Add the functions
But wait, our package doesn’t actually contain any code! Let’s add our
R functions by pasting them into an R file, in the R/ subdirectory.
use_r("simBrM")
Paste in the code from the top of this page.
Now if you run check() again, it’ll give a warning about
undocumented code and a note about not importing the functions
plot(), points(), and rnorm().
But if we run install() it will still install our package, which we
can load with library(simBrM). This will make simBrM() and
plotBrM() available to us. Note that we could also use load_all()
to do a quicker, temporary install-and-load, for development purposes.
Add documentation
So let’s add some documentation.
First, let’s set things up to use Roxygen2 with markdown.
use_roxygen_md()
Now we’ll open up the R/simBrM.R file and start writing the documentation.
Put the cursor inside the first function, simBrM(). We can get a
skeleton of Roxygen2 documentation through the menu bar: Code →
Insert Roxygen Skeleton.
The key things are: a title; maybe also a description. Then descriptions of each parameter and of the returned object. Finally, add some examples.
For each function, we’ll also want to add some @importFrom
directives, of functions that we use. This will lead to changes in the
#' @importFrom stats rnorm
We then process the documentation:
document()
We should also add Imports: stats, graphics to the DESCRIPTION
file.
use_package("stats")
use_package("graphics")
It says we should refer to the functions with stats:: and
graphics::, so maybe we should go back and edit those things.
But then finally, let’s check the package with check() and install
it with install().
Then stage, commit, and push.
Add a ReadMe
It’s always a good idea to include a ReadMe file, particularly for packages on GitHub, as it’s the ReadMe file that serves as sort of the home page for the software.
The key things to include in the ReadMe are the purpose, how to install, and a bit about usage.
To create a Markdown-based ReadMe file, do the following:
use_readme_md()
This creates a README.md file and then opens it for editing.
Many people are making R Markdown based ReadMe files for their R
packages, with working R code and graphs and such. If you want to do
that, look at use_readme_rmd().
Add a vignette
The three main things people look at are the ReadMe file, the examples in the help file, and tutorials. And in my experience, tutorials are the most popular.
In the context of R packages, tutorials are called “vignettes”. You can create one in R Markdown using the following:
use_vignette("simBrM", "Simulate Brownian motion")
Run check() and install() to make sure that there are no errors.
To install the vignette with the package, you need to do:
install(build_vignettes=TRUE)
You should then be able to see the vignette listed when you do the following:
vignette(package="simBrM")
And you can open the vignette with the following:
vignette("simBrM")
I recommend creating an introductory vignette that has the same name as the package. But you can include as many vignettes as you would like. Users really appreciate having many focused tutorials.